Revision: 83efacaea9
Edited مذكرة التسليم
@@ -1,190 +1,253 @@
-**A Sales Order is a confirmation of an order from your customer.**
-
-**It is usually a binding Contract with your Customer. Once your customer confirms the Quotation you can convert your Quotation into a Sales Order.**
-
-**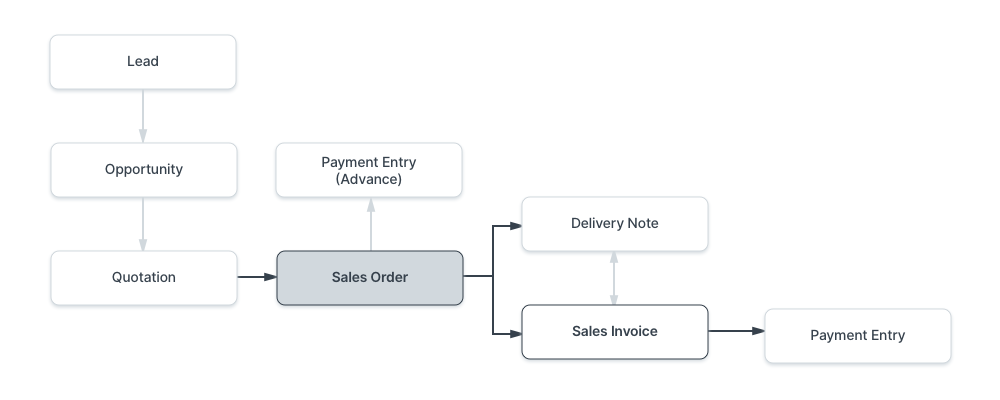**
-
-**To access Sales Order, go to:**
-
-> Home > Selling > Sales > Sales Order
-
-1\. Prerequisites
------------------
-
-Before creating and using a Sales Order, it is advised that you create the following first:
-
-1. [Customer](https://docs.erpnext.com/docs/v13/user/manual/en/CRM/customer)
-2. [Item](https://docs.erpnext.com/docs/v13/user/manual/en/stock/item)
-
-2\. How to create a Sales Order
--------------------------------
-
-1. Go to the Sales Order list, click on New.
-2. Select the Customer.
-3. Set the 'Delivery Date' - applied to the whole order.
-4. With Order Type, you can set whether it's a Sales order, Maintenance order, or from the online [Shopping Cart](https://docs.erpnext.com/docs/v13/user/manual/en/website/shopping-cart) of your website. By default, this value is set to "Sales".
-5. In the "Customer's Purchase Order" you can enter the Customers Purchase Order No. or other details which may be useful as a reference.
-6. Enter the items and quantities to be delivered in the Item table. If Item Prices are set for the items, the Rate field will be populated automatically. If not, enter the item Rate manually. You can also overwrite the auto-populated Item Rate in case you want to change that value.
-7. Click "Save" to save a draft of the Sales Order.
-8. "Submit" to submit the Sales Order to the System.
-
-### 2.1 Other ways to create a Sales Order
-
-1. You can also create a Sales Order from a submitted Quotation via the Create button on the top right.
-2. **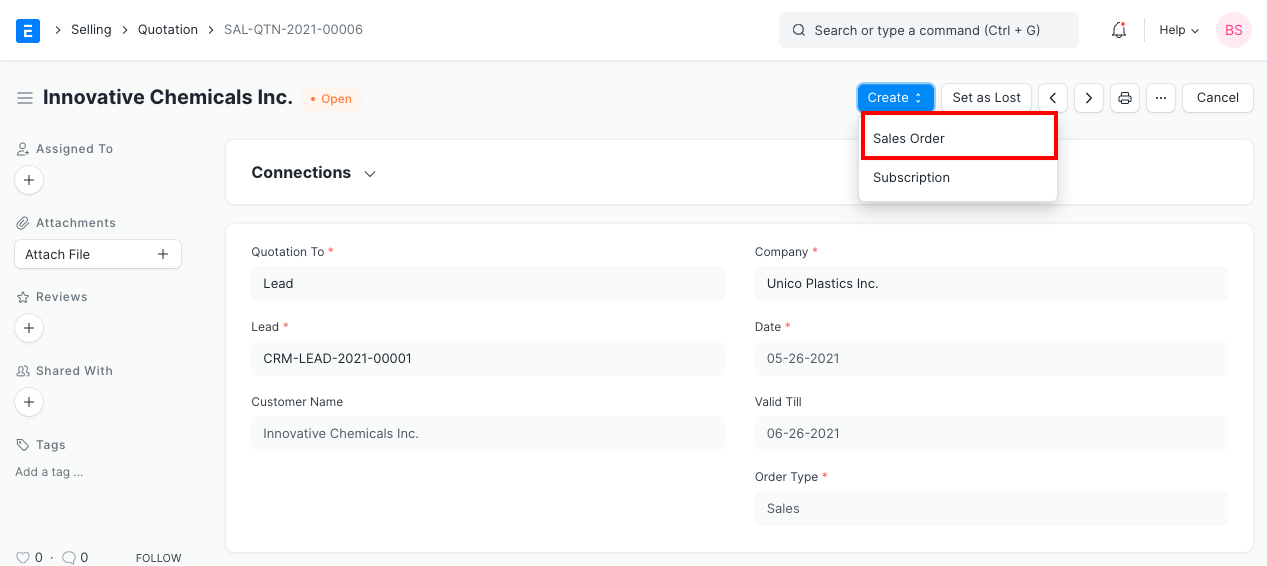**
-3. **Or you can create a new Sales Order and pull details from a Quotation.**
-4. **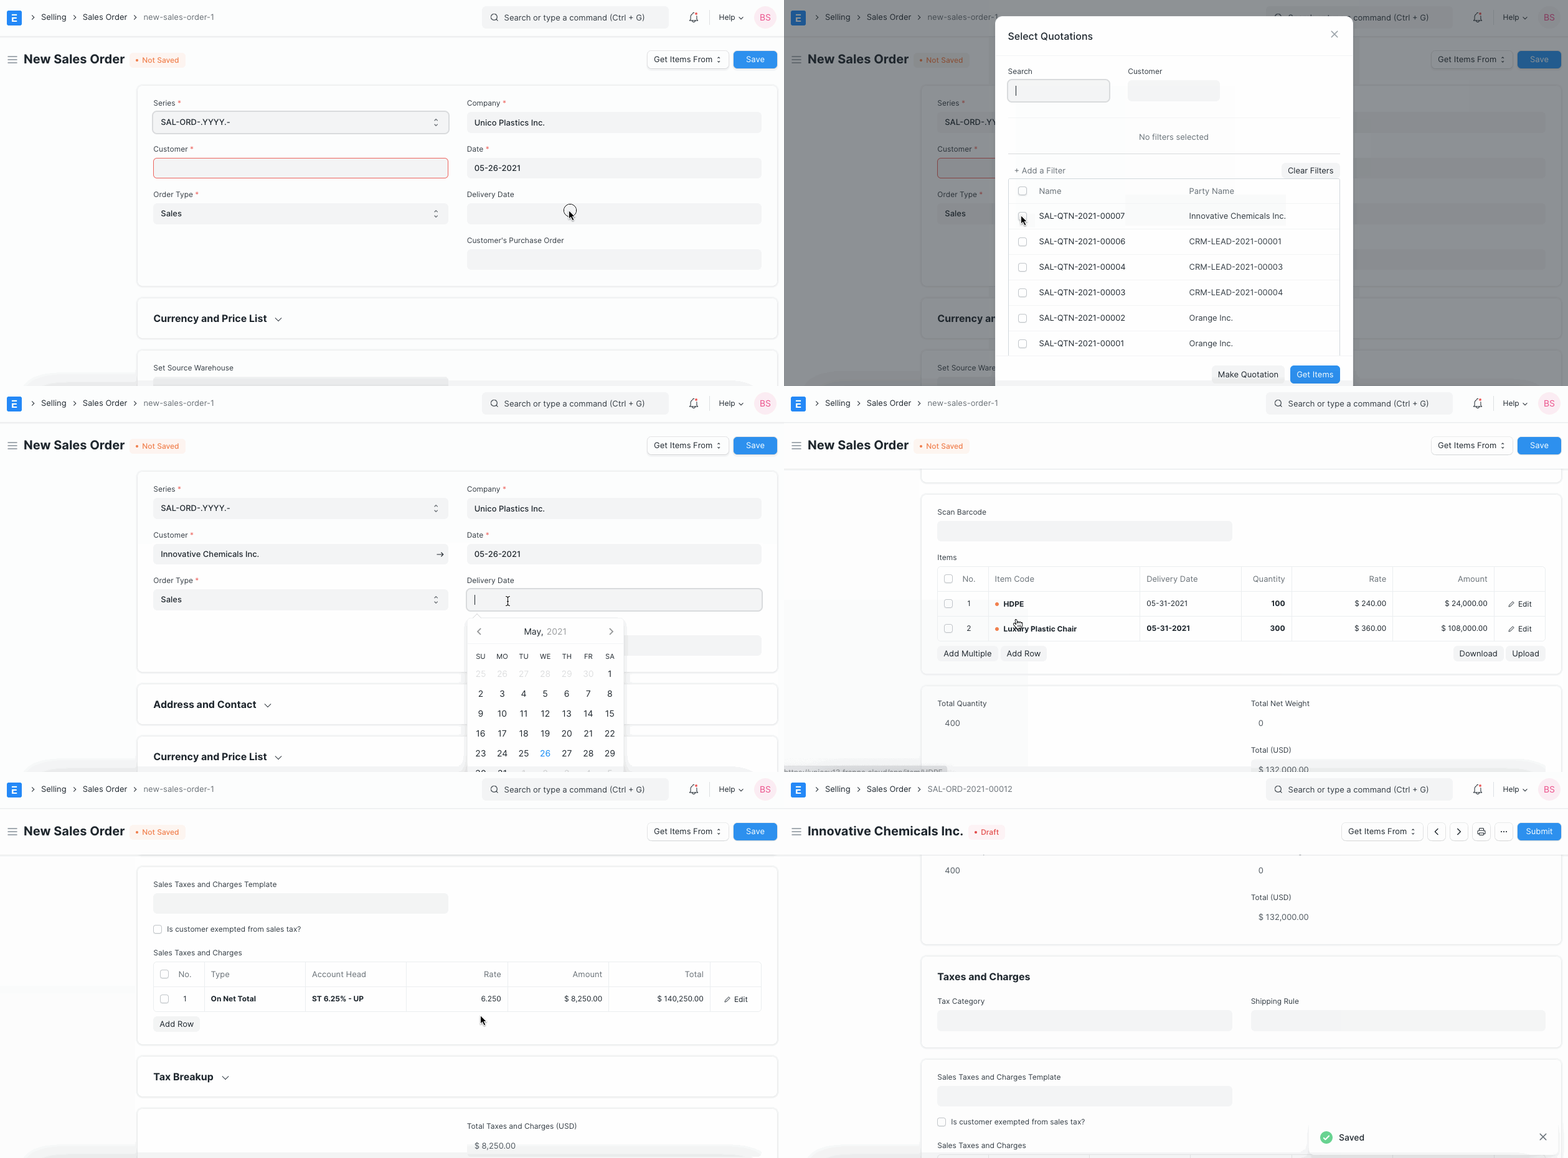**
-
-To allow for per-Customer, per-Item Pricing Rules, ("Customer A" pays $1.00 for "Item 1" but "Customer B" pays $1.25 for "Item 1"), there's a check box called 'Allow User to Edit Price List Rate in Transaction' in [Selling Settings](https://docs.erpnext.com/docs/v13/user/manual/en/selling/selling-settings). This enables saving the specific item price per customer when you change a price in the Sales Order.
-
-3\. Features
-------------
-
-### 3.1 Currency and Price List
-
-You can set the currency in which the quotation/sales order is to be sent. If you set a Pricing List, then the item prices will be fetched from that list. Ticking on 'Ignore Pricing Rule' will ignore the [Pricing Rules](https://docs.erpnext.com/docs/v13/user/manual/en/accounts/pricing-rule) set in Accounts > Pricing Rule.
-
-Read about [Price Lists](https://docs.erpnext.com/docs/v13/user/manual/en/stock/price-lists) and [Multi-Currency Transactions](https://docs.erpnext.com/docs/v13/user/manual/en/accounts/articles/managing-transactions-in-multiple-currency) to know more.
-
-### 3.1 Set Source Warehouse
-
-If you have the same stock in multiple warehouses, setting a warehouse here will cause all the items from the item table to be fetched from this warehouse. You need to have stock available in this 'source warehouse' you're setting. Note that this option will override the 'Default Warehouse' you've set in the Item master.
-
-### 3.2 The Items Table
-
-1. **Delivery Date against each item**: If there are multiple items and if you enter a delivery date in the first row, the date will be copied to other rows as well where it is blank. You'll have to set these if not set globally at the top of the Sales Order.
-2. A Sales Order displays the billed amount, valuation rate, and gross profit in the items table when you click on the inverted triangle to expand a row.
-3. You can also add Items in the Items table by scanning their barcodes if you have a barcode scanner. Read documentation for [tracking items using barcode](https://docs.erpnext.com/docs/v13/user/manual/en/stock/articles/track-items-using-barcode) to know more.
-4. **Delivery Warehouse**: This is the warehouse from where the stock will be picked to be delivered to your customer.
-5. **Drop Ship**: This is a situation where you do not keep items in stock in your own Warehouse but deliver items directly to a customer from a distributor. To enable drop shipping for an item tick on the 'Supplier delivers to Customer'. When you tick on this, the Delivery Warehouse option will disappear since you're not shipping the item. Select your supplier in the 'Supplier' field.
-6. Further, if you create a purchase order from this sales order, it'll be created for the supplier you selected here and only the items which are valid for drop shipping.
-7. **Planning**: Read [Projected Quantity](https://docs.erpnext.com/docs/v13/user/manual/en/stock/projected-quantity) to know about the fields under planning.
-
-The other fields in the item table are similar as explained in [Quotation](https://docs.erpnext.com/docs/v13/user/manual/en/selling/quotation#23-the-items-table).
-
-### 3.3 Packing List
-
-This is linked to the [Product Bundle](https://docs.erpnext.com/docs/v13/user/manual/en/selling/product-bundle) and appears only when the transaction involves a product bundle.
-
-The “Packing List” table will be automatically updated when you “Save” the Sales Order. If any Items in your table are Product Bundle (packets), then the “Packing List” will contain the exploded (detailed) list of your Items.
-
-You will be asked to select a Delivery Warehouse even for a product bundle item, this warehouse will be then updated in the Packing List items. You can change the warehouse, serial number, and batch in the packing list items in case items in your product bundle come from different warehouses.
-
-Here is what a Packing List looks like:
-
-**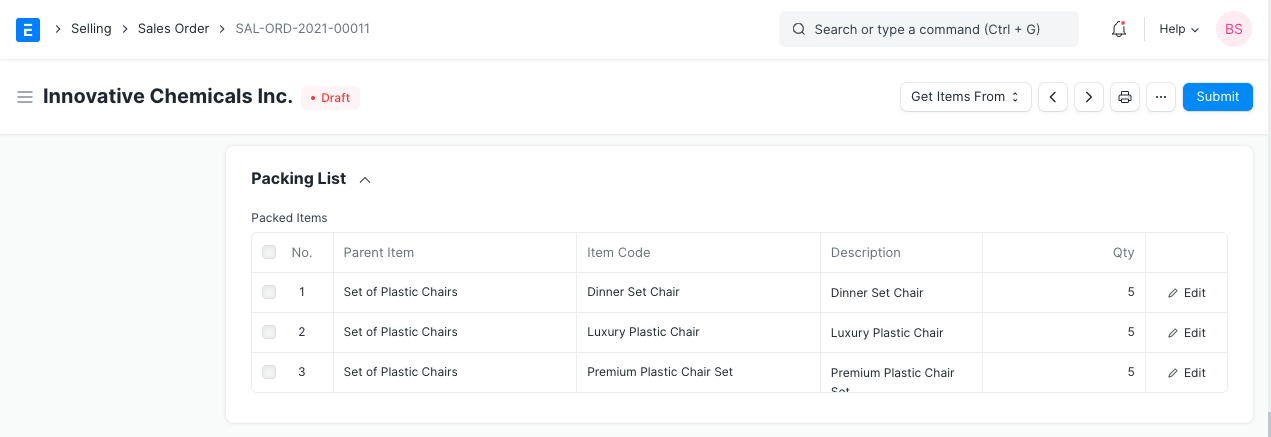**
-
-### 3.4 Taxes and Charges
-
-To add taxes to your Sales Order, you can select a [Sales Taxes and Charges Template](https://docs.erpnext.com/docs/v13/user/manual/en/selling/sales-taxes-and-charges-template) or add the taxes manually in the Sales Taxes and Charges table.
-
-The total taxes and charges will be displayed below the table. Clicking on Tax Breakup will show all the components and amounts.
-
-**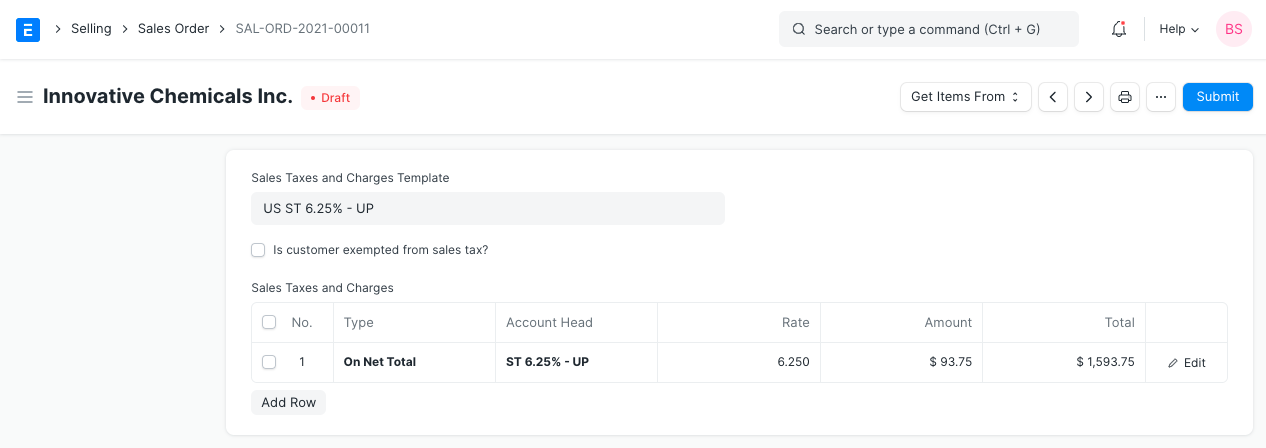**
-
-#### Shipping Rule
-
-A Shipping Rule helps set the cost of shipping an Item. The cost will usually increase with the distance of shipping. To know more, visit the [Shipping Rule](https://docs.erpnext.com/docs/v13/user/manual/en/selling/shipping-rule) page.
-
-If a Tax Category is selected, the template and tax table will be automatically populated. To know more, visit [this page](https://docs.erpnext.com/docs/v13/user/manual/en/accounts/tax-category).
-
-### 3.5 Additional Discount
-
-Other than offering discount per item, you can add a discount to the whole sales order in this section. This discount could be based on the Grand Total i.e., post tax/charges or Net total i.e., pre tax/charges. The additional discount can be applied as a percentage or an amount.
-
-Read [Applying Discount](https://docs.erpnext.com/docs/v13/user/manual/en/selling/articles/applying-discount) for more details.
-
-### 3.6 Payment Terms
-
-Sometimes payment is not done all at once. Depending on the agreement, half of the payment may be made before shipment and the other half after receiving the goods/services. You can add a Payment Terms template or add the terms manually in this section.
-
-Read [Payment Terms](https://docs.erpnext.com/docs/v13/user/manual/en/accounts/payment-terms) to know more.
-
-### 3.7 Terms and Conditions
-
-In Sales/Purchase transactions there might be certain Terms and Conditions based on which the Supplier provides goods or services to the Customer. You can apply the Terms and Conditions to transactions to transactions and they will appear when printing the document. To know about Terms and Conditions, [click here](https://docs.erpnext.com/docs/v13/user/manual/en/setting-up/print/terms-and-conditions)
-
-### 3.8 Print Settings
-
-#### Letterhead
-
-You can print your quotation/sales order on your company's letterhead. Know more [here](https://docs.erpnext.com/docs/v13/user/manual/en/setting-up/print/letter-head).
-
-'Group same items' will group the same items added multiple times in the items table. This can be seen when your print.
-
-#### Print Headings
-
-Quotations can also be titled as “Proforma Invoice” or “Proposal”. You can do this by selecting a **Print Heading**. To create new Print Headings go to: Home > Settings > Printing > Print Heading. Know more [here](https://docs.erpnext.com/docs/v13/user/manual/en/setting-up/print/print-headings).
-
-### 3.9 More Information
-
-1. **Campaign:** A Sales campaign can be associated with the quotation. A set of quotations can be part of a sales campaign.
-2. **Source:** A Lead Source type can be linked if quoting to a lead, whether from a campaign, from a supplier, an exhibition etc,. Select Existing Customer if quoting to a customer.
-3. **Inter Company Order Reference**: If two of your companies are part of the same organization or have a parent-child relationship, you can link a Purchase Order to this Sales Order. Know more about inter-company invoicing [here](https://docs.erpnext.com/docs/v13/user/manual/en/accounts/inter-company-invoices).
-4. **Project**: If your Sales Order is part of a project, you can link it here and the Project progress will be updated.
-
-### 3.10 Billing and Delivery Status
-
-1. **Status**: The status of the Sales Order whether a Draft, On Hold, To Deliver and Bill, To Bill, To Deliver, Completed, Cancelled, or Closed.
-2. **Amount Billed and Delivered percent**: The percentage of amount billed and the items delivered from the Sales Order.
-
-### 3.11 Commission
-
-If the sale took place via one of your Sales Partners, you can add their commission details here. Enter the commission rate and the commission amount will be displayed below.
-
-### 3.12 Sales Team
-
-**Sales Persons:** ERPNext allows you to add multiple Sales Persons who may have worked on this deal. You can change the contribution percentage of the Sales Persons and track how much incentives they earned on this deal.
-
-**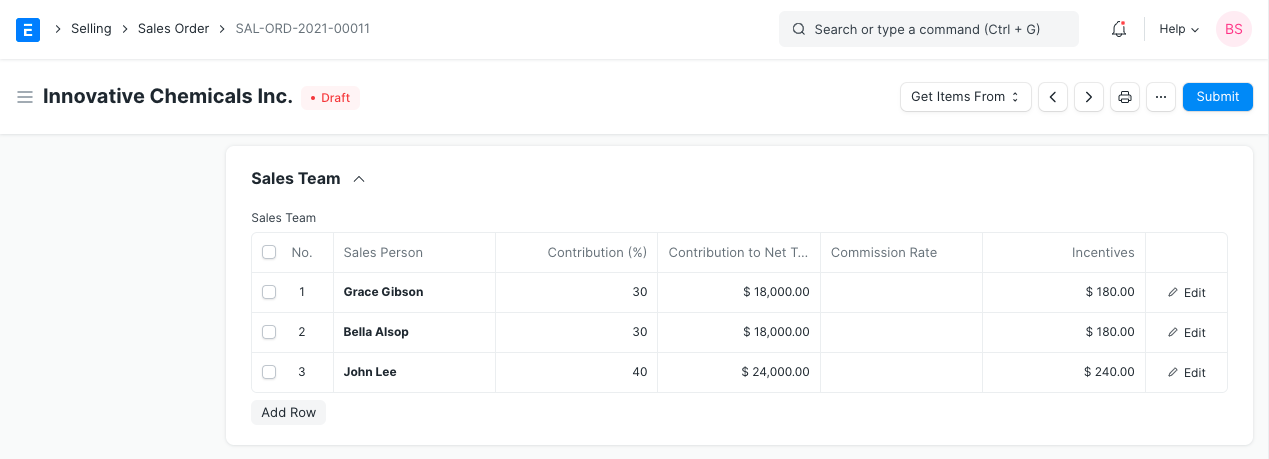**
-
-### 3.13 Auto Repeat Section
-
-Auto repeating Sales Orders is like a subscription. Set a start and end date for the auto-repeat. Select the Auto Repeat created. To know more about auto repeat [click here](https://docs.erpnext.com/docs/v13/user/manual/en/automation/auto-repeat).
-
-### 3.14 After Submitting
-
-Sales Order is a “Submittable” transaction. You will be able to execute further steps (like making a Delivery Note) only after “Submitting” a Sales Order.
-
-Once you “Submit” your Sales Order, you can trigger actions from the Sales Order:
-
-1. You can Add, Update, Delete items in the Sales Order by clicking on the **Update Items** button. However you cannot delete items which has already been delivered or has work order assigned to it.
-2. Status: Once submitted, you can hold a Sales Order or Close it.
-3. Create: From a submitted Sales Order, you can create the following:
-4. Delivery Note - To make a shipment entry. You can also make Delivery Note for selected items based on the delivery date.
-5. Work Order - To start a Work Order with the raw materials.
-6. Sales Invoice - To bill the Order.
-7. Material Request - To request re-stocking materials if out of stock.
-8. Request for Raw Materials - To request raw materials required for manufacturing.
-9. Project - To create a project based on the Sales Order.
-10. Subscription - To auto repeat the Sales Order, i.e., make it a subscription.
-11. Payment Request - To make a Payment Request.
-12. Payment - To record payment against the Sales Order.
-
-These actions can also be seen at the top of the Dashboard. You can also make an accounting Journal Entry based on the Sales Order from the dashboard.
-
-**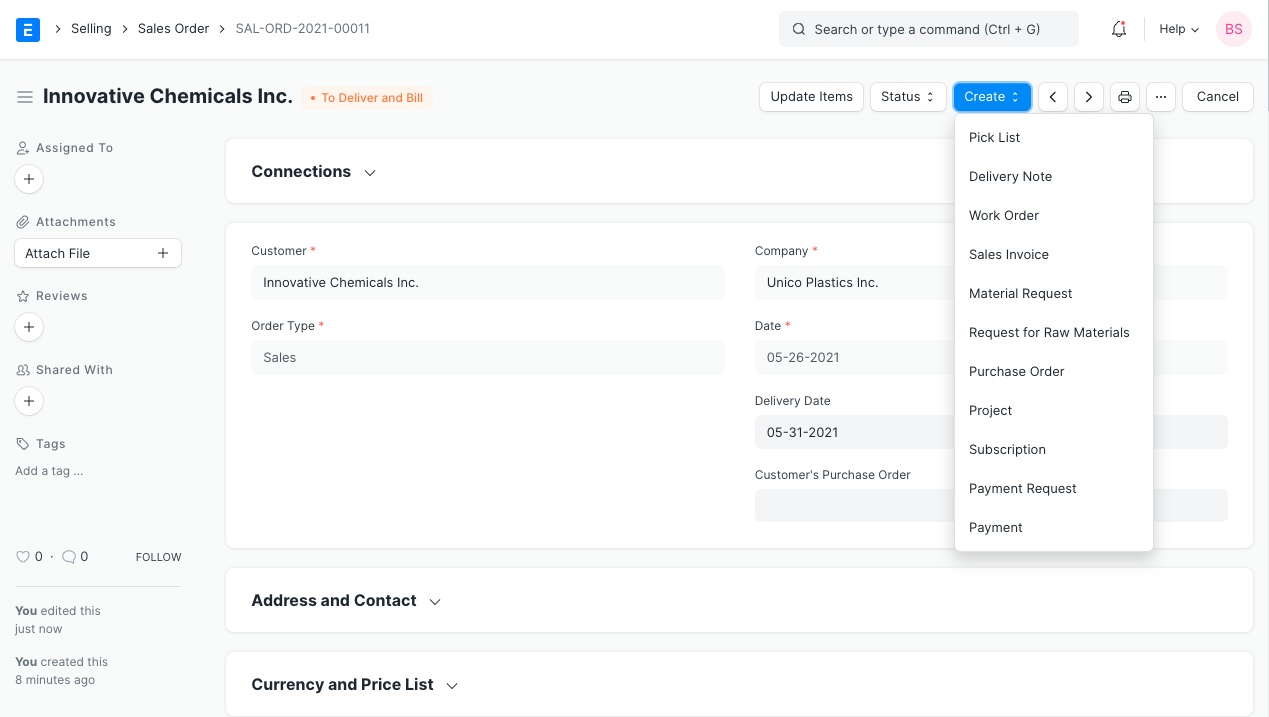**
-
-### 3.15 Sales Order with Order type 'Maintenance'
-
-When the 'Order Type' of the Sales Order is 'Maintenance' follow these steps:
-
-1. Enter Currency, Price list, and Item details.
-2. Mention taxes and other information.
-3. Save and Submit the form.
-4. Once the form is submitted, the Create button will provide these choices specific to the maintenance Order Type.
-5. i) Maintenance Visit ii) Maintenance Schedule.
-6. **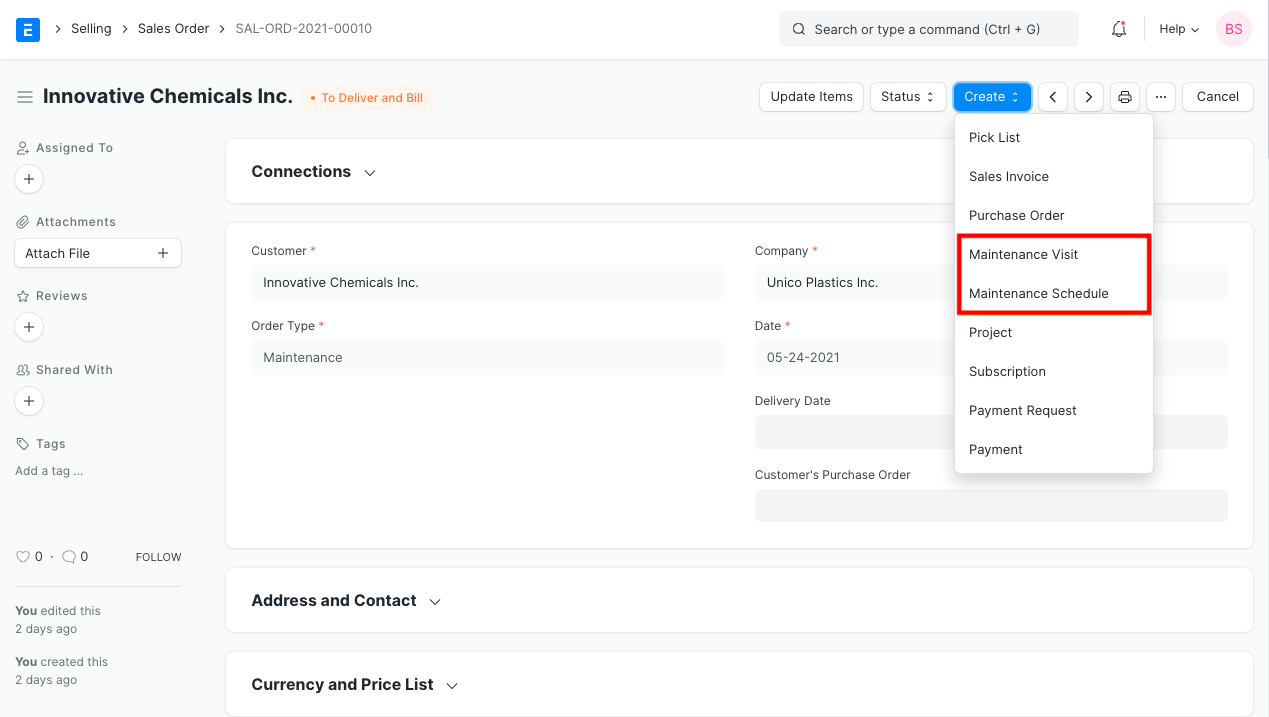**
-
-> **Note 1:** By clicking on the Action button and selecting 'Maintenance Visit' you can directly fill the visit form. The Sales Order details will be fetched directly.
-
-> **Note 2:** By clicking on the Action button and selecting 'Maintenance Schedule' you can fill the schedule details. The Sales Order details will be fetched directly.
-
-> **Note 3:** By clicking on the Invoice button you can make an Invoice for your services. The sales orders details will be fetched directly.
-
-### 4\. Related Topics
-
-1. [Quotation](https://docs.erpnext.com/docs/v13/user/manual/en/selling/quotation)
-2. [Close Sales Order](https://docs.erpnext.com/docs/v13/user/manual/en/selling/articles/close-sales-order)
-3. [Amending Sales Order After Submit](https://docs.erpnext.com/docs/v13/user/manual/en/selling/articles/amending-sales-order-after-submit)
-4. [Pick List](https://docs.erpnext.com/docs/v13/user/manual/en/stock/pick-list#21-create-pick-list-from-sales-order)
+<style>
+@import url('https://fonts.googleapis.com/css2?family=Tajawal:wght@200&display=swap');
+p,h1,h2,li,h3,a,blockquote,body{
+ font-family:'Tajwal';
+ direction:rtl;
+ text-align:start;
+}
+</style>
+
+**يتم عمل مذكرة تسليم عندما يتم شحن شحنة من مستودع الشركة إلى العميل.**
+
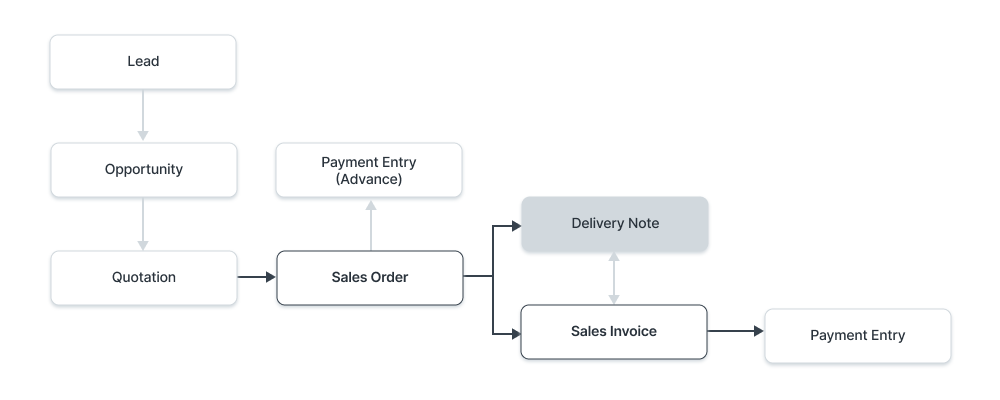
+عادةً ما يتم إرسال نسخة من مذكرة التسليم مع شركة النقل. تحتوي مذكرة التسليم على قائمة العناصر التي تم إرسالها في الشحنة وتقوم بتحديث المخزون. مذكرة التسليم هي خطوة اختيارية ويمكن إنشاء فاتورة مبيعات مباشرة من أمر المبيعات.
+
+للوصول إلى قائمة مذكرة التسليم ، انتقل إلى:
+
+> الصفحة الرئيسية> مخزون> معاملات المخزون> مذكرة التسليم
+
+
+
+1\. المتطلبات الأساسية [](https://docs.erpnext.com/docs/v13/user/manual/en/stock/delivery-note#1-prerequisites)
+----------------------------------------------------------------------------------------------------------------
+
+قبل إنشاء واستخدام مذكرة التسليم ، يُنصح بإنشاء ما يلي أولاً:
+
+1. [طلب المبيعات](https://docs.erpnext.com/docs/v13/user/manual/en/selling/sales-order)
+
+> ملاحظة: من الإصدار 13 وما بعده ، قدمنا دفتر الأستاذ غير القابل للتغيير والذي يغير قواعد إلغاء إدخالات المخزون وترحيل معاملات الأسهم القديمة في ERPNext. [تعلم المزيد هنا](https://docs.erpnext.com/docs/v13/user/manual/en/accounts/articles/immutable-ledger-in-erpnext) .
+
+2\. كيفية إنشاء مذكرة التسليم [](https://docs.erpnext.com/docs/v13/user/manual/en/stock/delivery-note#2-how-to-create-a-delivery-note)
+---------------------------------------------------------------------------------------------------------------------------------------
+
+إدخال إشعار التسليم مشابه جدًا لإيصال الشراء. يتم إنشاؤه عادةً من أمر مبيعات "مُرسَل" (لم يتم شحنه) بالنقر فوق إنشاء> تسليم.
+
+لإنشاء مذكرة تسليم _يدويًا_ (غير مستحسن) ، اتبع الخطوات التالية:
+
+1. انتقل إلى قائمة مذكرة التسليم ، وانقر فوق جديد.
+2. يمكن جلب تفاصيل العميل والعنصر بالنقر فوق "الحصول على عناصر من> طلب المبيعات".
+3. سيتم جلب UOM والأسعار تلقائيًا.
+4. حفظ وإرسال.
+5. 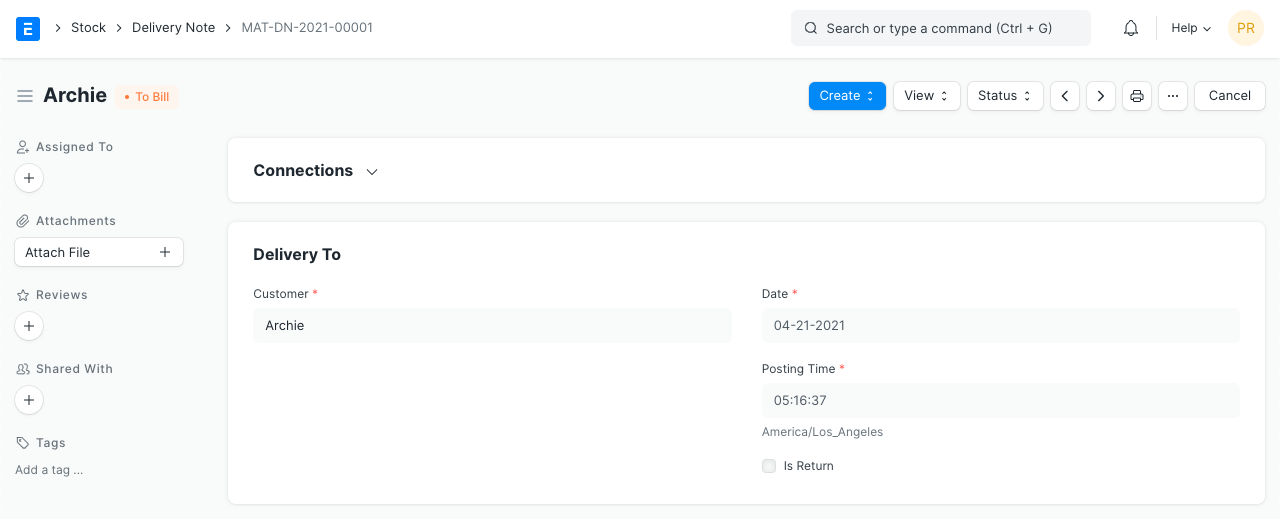
+
+لجلب العناصر من طلب المبيعات ، انقر فوق الحصول على عناصر من> طلب المبيعات. سيؤدي هذا إلى فتح نافذة منبثقة حيث يمكنك البحث عن أوامر المبيعات واختيار واحدة.
+
+ستلاحظ أن جميع المعلومات حول العناصر غير المشحونة والتفاصيل الأخرى يتم ترحيلها من أمر المبيعات الخاص بك إذا قمت بإنشاء مذكرة التسليم من هناك.
+
+يمكنك أيضًا تعديل تاريخ الترحيل ووقته ، ويتم تعيين التاريخ والوقت الحاليين عند إنشاء مذكرة التسليم.
+
+### 2.1 الحالات [](https://docs.erpnext.com/docs/v13/user/manual/en/stock/delivery-note#21-statuses)
+
+هذه هي الحالات التي يمكن أن تكون فيها مذكرة التسليم:
+
+1. **المسودة** : تم حفظ المسودة ولكن لم يتم إرسالها إلى النظام بعد.
+2. **إلى الفاتورة** : لم يتم إصدار فاتورة بعد باستخدام [فاتورة المبيعات](https://docs.erpnext.com/docs/v13/user/manual/en/accounts/sales-invoice) .
+3. **مكتمل** : إرسال وإرسال جميع العناصر.
+4. **تم إصدار الإرجاع** : تم إرجاع جميع العناصر.
+5. **ملغاة** : ألغيت مذكرة التسليم.
+6. **مغلق** : الغرض من الإغلاق هو إدارة الإغلاق على المكشوف. على سبيل المثال ، طلب العميل 20 كمية ولكن أغلق عند 15 كمية. لا يتم إرسال الخمسة المتبقية أو إصدار فواتير بها.
+
+### 2.2 التسليم الجزئي [](https://docs.erpnext.com/docs/v13/user/manual/en/stock/delivery-note#22-partial-deliveries)
+
+عند إنشاء مذكرة تسليم من أمر مبيعات ، يمكن تغيير الكميات. لذلك إذا كان طلب المبيعات يحتوي على 10 عناصر ليتم تسليمها وكنت تقوم بتسليم 5 فقط هذا الأسبوع والباقي في الأسبوع المقبل ، فيمكنك إنشاء مذكرتي تسليم في غضون أسبوعين.
+
+### 2.3 من قائمة الاختيار [](https://docs.erpnext.com/docs/v13/user/manual/en/stock/delivery-note#23-from-pick-list)
+
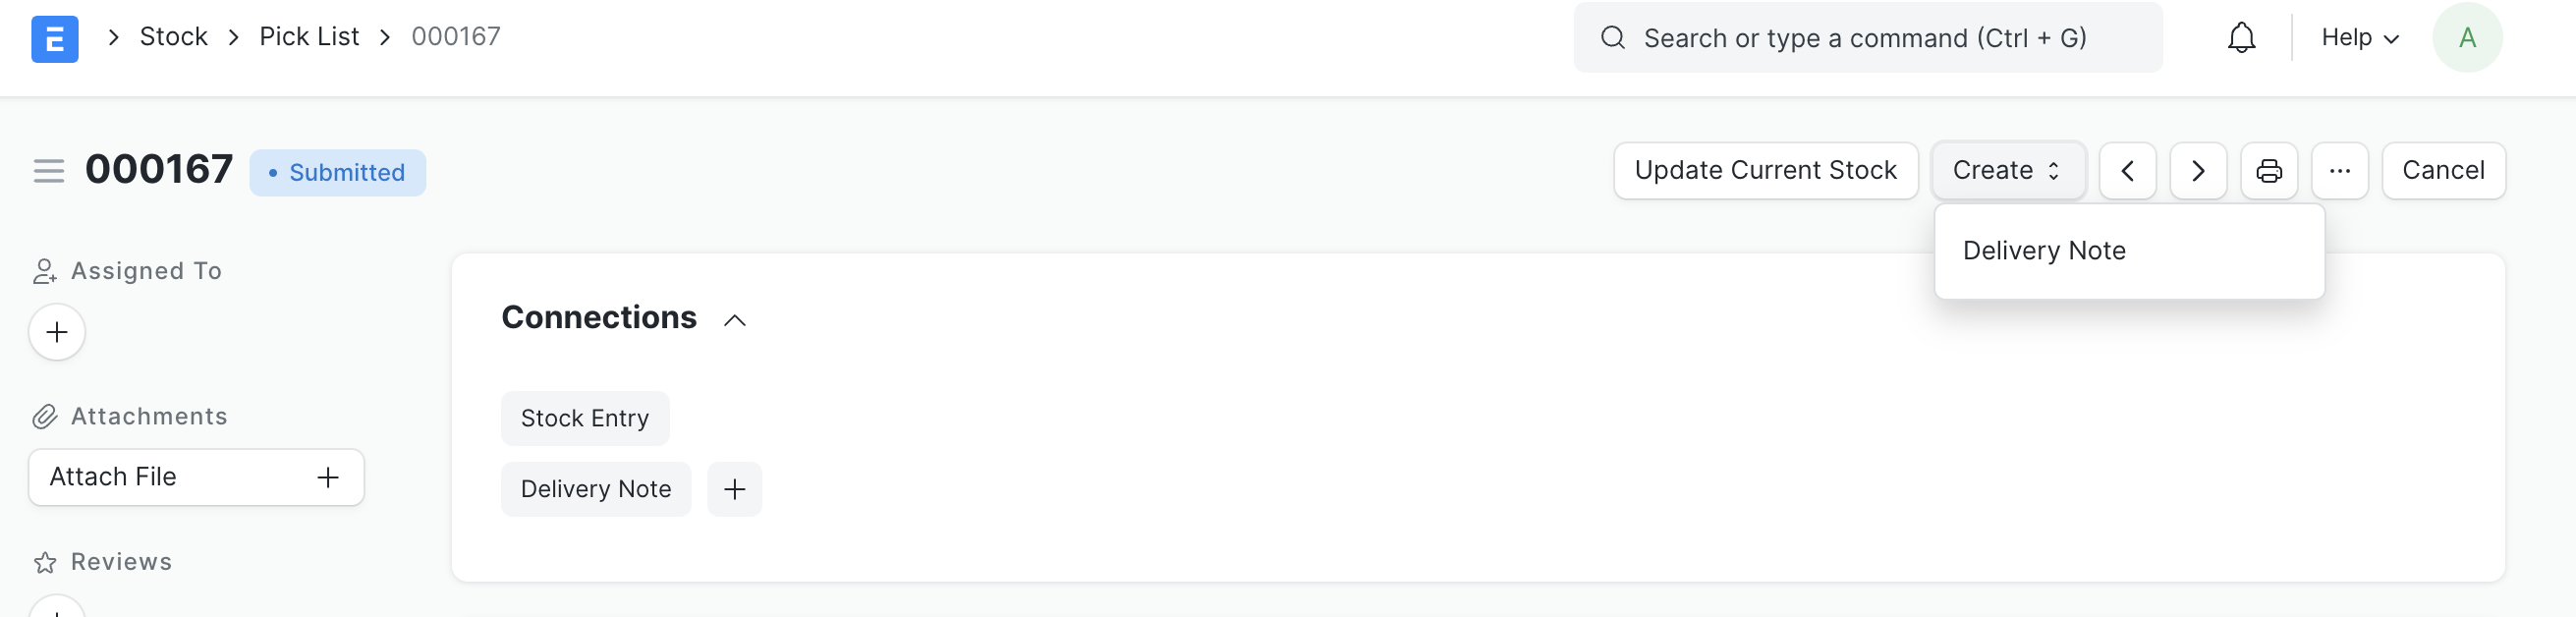
+يمكنك إنشاء ملاحظات التسليم بشكل مجمّع ، من قوائم الاختيار أيضًا. من قائمة الاختيار المقدمة ، انقر فوق إنشاء -> مذكرة التسليم.
+
+
+
+سيؤدي هذا إلى إنشاء ملاحظات تسليم منفصلة لأوامر المبيعات ، مجمعة حسب العميل. إذا لم يكن عنصر قائمة الانتقاء مرتبطًا بأمر مبيعات (تمت إضافته يدويًا بواسطة المستخدم) ، فسيتم إنشاء اسم مميز منفصل لجميع هذه العناصر أيضًا.
+
+3\. الإجراءات ذات الصلة [](https://docs.erpnext.com/docs/v13/user/manual/en/stock/delivery-note#3-related-actions)
+-------------------------------------------------------------------------------------------------------------------
+
+### 3.1 تفاصيل طلب شراء العميل [](https://docs.erpnext.com/docs/v13/user/manual/en/stock/delivery-note#31-customer-purchase-order-details)
+
+يمكنك إدخال رقم طلب الشراء الخاص بالعميل هنا للرجوع إليه.
+
+### 3.2 العنوان والاتصال [](https://docs.erpnext.com/docs/v13/user/manual/en/stock/delivery-note#32-address-and-contact)
+
+1. **عنوان الشحن** : عنوان العميل الذي سيتم شحن العناصر إليه.
+2. **شخص الاتصال** : إذا كان العميل عبارة عن مؤسسة ، فأضف جهة الاتصال في هذا الحقل.
+
+بالنسبة للهند ، يمكن إضافة التفاصيل التالية لضريبة السلع والخدمات:
+
+1. رقم GSTIN الخاص بالعميل
+2. مكان التوريد
+3. عنوان إرسال الفواتير GSTIN
+4. شركة GSTIN
+5. اسم عنوان الشركة
+
+[يتم تخزين جهات الاتصال](https://docs.erpnext.com/docs/v13/user/manual/en/CRM/contact) والعناوين بشكل منفصل بحيث يمكنك إرفاق عدة جهات اتصال أو عناوين بالعميل [.](https://docs.erpnext.com/docs/v13/user/manual/en/CRM/address)
+
+### 3.3 قائمة العملات والأسعار [](https://docs.erpnext.com/docs/v13/user/manual/en/stock/delivery-note#33-currency-and-price-list)
+
+يمكنك تعيين العملة التي سيتم إرسال مذكرة التسليم بها. يتم جلب هذا عادةً إذا تم تعيينه في طلب المبيعات. إذا قمت بتعيين قائمة أسعار ، فسيتم جلب أسعار العناصر من تلك القائمة. سيؤدي تجاهل قاعدة التسعير إلى تجاهل قواعد التسعير المحددة في الحسابات> قاعدة التسعير.
+
+اقرأ عن [قوائم الأسعار](https://docs.erpnext.com/docs/v13/user/manual/en/stock/price-lists) والمعاملات [متعددة العملات](https://docs.erpnext.com/docs/v13/user/manual/en/accounts/articles/managing-transactions-in-multiple-currency) لمعرفة المزيد.
+
+### 3.4 المستودعات [](https://docs.erpnext.com/docs/v13/user/manual/en/stock/delivery-note#34-warehouses)
+
+1. **تعيين مستودع المصدر** : هذا هو المكان الذي سيتم فيه الحصول على العناصر لإرسالها إلى العميل.
+2. **إلى المستودع** : في سيناريو المبيعات العادي ، يخرج العنصر من المستودع الخاص بك ويصل إلى العميل. ومع ذلك ، إذا كنت ترغب في الاحتفاظ بعينة المخزون ، أدخل المستودع هنا.
+
+### 3.5 جدول العناصر [](https://docs.erpnext.com/docs/v13/user/manual/en/stock/delivery-note#35-items-table)
+
+1. **الباركود** : يمكنك تتبع العناصر باستخدام [الباركود](https://docs.erpnext.com/docs/v13/user/manual/en/stock/articles/track-items-using-barcode) .
+2. سيتم جلب رمز العنصر والاسم والوصف والصورة والشركة المصنعة من مدير [السلعة](https://docs.erpnext.com/docs/v13/user/manual/en/stock/item) .
+3. **مسح الرمز الشريطي** : يمكنك إضافة عناصر في جدول العناصر عن طريق مسح الباركود الخاص بهم إذا كان لديك ماسح ضوئي للرمز الشريطي. اقرأ الوثائق الخاصة [بتتبع العناصر باستخدام الرمز الشريطي](https://docs.erpnext.com/docs/v13/user/manual/en/stock/articles/track-items-using-barcode) لمعرفة المزيد.
+4. **الخصم والهامش** : يمكنك تطبيق خصم على العناصر الفردية من حيث النسبة المئوية أو المبلغ الإجمالي للسلعة. اقرأ [تطبيق الخصم](https://docs.erpnext.com/docs/v13/user/manual/en/selling/articles/applying-discount) لمزيد من التفاصيل.
+5. **السعر** : يتم جلب السعر إذا تم تعيينه في [قائمة الأسعار](https://docs.erpnext.com/docs/v13/user/manual/en/stock/price-lists) ويتم حساب المبلغ الإجمالي.
+6. **قالب ضريبة العنصر** : يمكنك تعيين نموذج ضريبة العنصر لتطبيق مبلغ ضريبة معين على هذا العنصر المحدد. لمعرفة المزيد ، قم بزيارة [هذه الصفحة](https://docs.erpnext.com/docs/v13/user/manual/en/accounts/item-tax-template) .
+7. يتم جلب تفاصيل "وزن السلعة لكل وحدة" و "وحدة قياس الوزن" إذا تم تعيينها في مدير السلعة.
+8. **المستودع والمرجع** : يظهر المستودع الذي يتم إرسال الأصناف منه إلى العميل. أيضًا ، سيتم عرض أمر المبيعات إذا كانت مذكرة التسليم هذه هي تدفق الإنشاء: "أمر المبيعات> مذكرة التسليم".
+9. [رقم الدُفعة](https://docs.erpnext.com/docs/v13/user/manual/en/stock/batch) والرقم **التسلسلي** : إذا كان العنصر الخاص بك مسلسلاً أو مجمّعًا ، فسيتعين عليك إدخال [الرقم التسلسلي](https://docs.erpnext.com/docs/v13/user/manual/en/stock/serial-no) والدُفعة في جدول العناصر. يُسمح لك بإدخال أرقام مسلسلة متعددة في صف واحد (كل منها في سطر منفصل) ويجب عليك إدخال نفس عدد الأرقام المسلسلة مثل الكمية.
+10. سيتم عرض "الكمية المتوفرة في المستودع" و "الكمية المتوفرة في الدُفعة في المستودع" و "الكمية المُثبتة". لمعرفة المزيد حول التثبيت ، قم بزيارة صفحة [ملاحظات التثبيت](https://docs.erpnext.com/docs/v13/user/manual/en/stock/installation-note) .
+11. **ملاحظة** : يجب أن تكون السلعة مسلسلة أو مجمعة حتى تعمل هذه الميزات. إذا كان العنصر متسلسلًا ، فستظهر نافذة منبثقة حيث يمكنك إدخال الأرقام التسلسلية.
+12. حساب المصاريف هو الحساب الذي سيتم خصم المبلغ منه. سيسمح تحديد "السماح بسعر التقييم الصفري" بإرسال إشعار التسليم حتى إذا كان معدل تقييم السلعة هو 0. يمكن أن يكون هذا عنصرًا نموذجيًا أو بسبب التفاهم المتبادل مع المورد الخاص بك.
+13. تساعد أبعاد المحاسبة في تمييز كل معاملة بأبعاد مختلفة دون الحاجة إلى إنشاء مراكز تكلفة جديدة. تحتاج إلى إنشاء أبعاد محاسبية أولاً ، لمعرفة المزيد ، قم بزيارة [هذه الصفحة](https://docs.erpnext.com/docs/v13/user/manual/en/accounts/accounting-dimensions) .
+14. سينشئ **فاصل الصفحة فاصل صفحة قبل هذا العنصر مباشرة عند الطباعة.**
+
+### 3.6 تتبع فحص الجودة [](https://docs.erpnext.com/docs/v13/user/manual/en/stock/delivery-note#36-tracking-quality-inspection)
+
+إذا كان من الضروري تسجيل استقصاءات الجودة لعناصر معينة (إذا قمت بتعيينها في مدير السلعة) ، فستحتاج إلى تحديث حقل "استقصاء الجودة". سيسمح لك النظام فقط بـ "إرسال" مذكرة التسليم إذا تقوم بتحديث "فحص الجودة".
+
+بعد تمكين معايير الاستقصاء في [نموذج](https://docs.erpnext.com/docs/v13/user/manual/en/stock/item#216-inspection-criteria) الصنف للمبيعات وإرفاق نموذج استقصاء الجودة هناك ، يمكن تسجيل استقصاءات الجودة في ملاحظات التسليم.
+
+### 3.7 الضرائب والرسوم [](https://docs.erpnext.com/docs/v13/user/manual/en/stock/delivery-note#37-taxes-and-charges)
+
+سيتم جلب الضرائب والرسوم من [طلب المبيعات](https://docs.erpnext.com/docs/v13/user/manual/en/buying/purchase-order) .
+
+قم بزيارة صفحة [نموذج ضرائب ورسوم المبيعات](https://docs.erpnext.com/docs/v13/user/manual/en/selling/sales-taxes-and-charges-template) لمعرفة المزيد عن الضرائب.
+
+سيتم عرض إجمالي الضرائب والرسوم أسفل الجدول.
+
+لإضافة ضرائب تلقائيًا عبر فئة ضريبية ، قم بزيارة [هذه الصفحة](https://docs.erpnext.com/docs/v13/user/manual/en/accounts/tax-category) .
+
+تأكد من تحديد جميع الضرائب الخاصة بك في جدول الضرائب والرسوم بشكل صحيح للحصول على تقييم دقيق.
+
+#### قاعدة الشحن [](https://docs.erpnext.com/docs/v13/user/manual/en/stock/delivery-note#shipping-rule)
+
+تساعد قاعدة الشحن في تحديد تكلفة شحن عنصر. عادة ما تزداد التكلفة مع مسافة الشحن. لمعرفة المزيد ، قم بزيارة صفحة [قاعدة الشحن](https://docs.erpnext.com/docs/v13/user/manual/en/selling/shipping-rule) .
+
+### 3.8 خصم إضافي [](https://docs.erpnext.com/docs/v13/user/manual/en/stock/delivery-note#38-additional-discount)
+
+يمكن تعيين أي خصومات إضافية على الطلب بالكامل في هذا القسم. يمكن أن يعتمد هذا الخصم على الإجمالي الكلي ، أي بعد الضريبة / الرسوم أو الإجمالي الصافي ، أي قبل الضرائب / الرسوم. يمكن تطبيق الخصم الإضافي كنسبة مئوية أو مبلغ. اقرأ [تطبيق الخصم](https://docs.erpnext.com/docs/v13/user/manual/en/selling/articles/applying-discount) لمزيد من التفاصيل.
+
+### 3.9 الشروط والأحكام [](https://docs.erpnext.com/docs/v13/user/manual/en/stock/delivery-note#39-terms-and-conditions)
+
+في معاملات البيع / الشراء قد تكون هناك شروط وأحكام معينة بناءً عليها يقدم المورد السلع أو الخدمات للعميل. يمكنك تطبيق الشروط والأحكام على المعاملات على المعاملات وستظهر عند طباعة المستند. للتعرف على الشروط والأحكام ، [انقر هنا](https://docs.erpnext.com/docs/v13/user/manual/en/setting-up/print/terms-and-conditions)
+
+### 3.10 معلومات الناقل [](https://docs.erpnext.com/docs/v13/user/manual/en/stock/delivery-note#310-transporter-information)
+
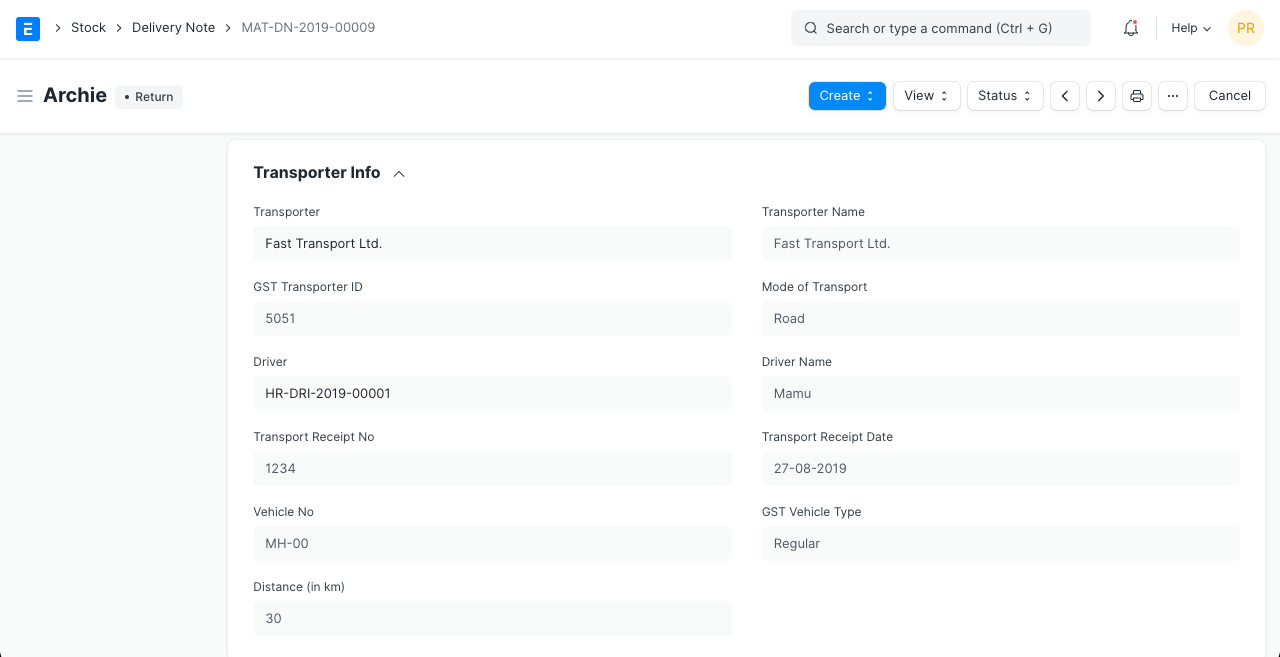
+إذا قمت بالاستعانة بمصادر خارجية لنقل العناصر إلى موقع التسليم الخاص بها ، فيمكن إضافة تفاصيل شركة النقل. هذا ليس هو نفس [انخفاض الشحن](https://docs.erpnext.com/docs/v13/user/manual/en/selling/articles/drop-shipping) .
+
+1. **الناقل** : المورد الذي سينقل السلعة إلى عميلك. يجب تمكين ميزة الناقل في مدير المورد لتحديد [المورد](https://docs.erpnext.com/docs/v13/user/manual/en/buying/supplier) هنا.
+2. **سائق** : يمكنك إضافة سائق هنا الذي سيقود وضع النقل.
+
+
+
+يمكن تسجيل التفاصيل التالية:
+
+1. المسافة بالكيلومتر
+2. وسيلة النقل سواء كانت برية أو جوية أو سكة حديدية أو سفينة.
+
+للهند ، ضريبة السلع والخدمات:
+
+1. معرف ناقل ضريبة السلع والخدمات
+2. رقم إيصال النقل
+3. رقم المركبة يمكن تغيير نوع المركبة GST
+
+سيتم جلب تاريخ استلام النقل واسم السائق.
+
+### 3.11 مزيد من المعلومات [](https://docs.erpnext.com/docs/v13/user/manual/en/stock/delivery-note#311-more-information)
+
+يمكن ربط مذكرة التسليم بما يلي لأغراض التتبع:
+
+1. [مشروع](https://docs.erpnext.com/docs/v13/user/manual/en/projects/project)
+2. [الحملة الانتخابية](https://docs.erpnext.com/docs/v13/user/manual/en/CRM/campaign)
+3. [مصدر](https://docs.erpnext.com/docs/v13/user/manual/en/CRM/lead_source)
+
+### 3.11 إعدادات الطباعة [](https://docs.erpnext.com/docs/v13/user/manual/en/stock/delivery-note#311-printing-settings)
+
+#### ورقة ذات رأسية [](https://docs.erpnext.com/docs/v13/user/manual/en/stock/delivery-note#letterhead)
+
+يمكنك طباعة مذكرة التسليم الخاصة بك على ورق الشركة الخاص بك. اعرف المزيد [هنا](https://docs.erpnext.com/docs/v13/user/manual/en/setting-up/print/letter-head) .
+
+ستجمع "تجميع العناصر نفسها" نفس العناصر المضافة عدة مرات في جدول العناصر. يمكن ملاحظة ذلك عند طباعتك.
+
+#### عناوين الطباعة [](https://docs.erpnext.com/docs/v13/user/manual/en/stock/delivery-note#print-headings)
+
+يمكن أيضًا تغيير عناوين إيصال الشراء عند طباعة المستند. يمكنك القيام بذلك عن طريق تحديد **عنوان الطباعة** . لإنشاء عناوين طباعة جديدة ، انتقل إلى: الصفحة الرئيسية> الإعدادات> الطباعة> عنوان الطباعة. اعرف المزيد [هنا](https://docs.erpnext.com/docs/v13/user/manual/en/setting-up/print/print-headings) .
+
+توجد مربعات اختيار إضافية لطباعة مذكرة التسليم بدون المبلغ ، وقد يكون ذلك مفيدًا عندما يكون العنصر ذا قيمة عالية. يمكنك أيضًا تجميع نفس العناصر في صف واحد عند الطباعة.
+
+### 3.12 الحالة [](https://docs.erpnext.com/docs/v13/user/manual/en/stock/delivery-note#312-status)
+
+يتم عرض حالة المستند ونسبة التثبيت هنا. يمكن إدخال أي تعليمات إضافية للتسليم هنا.
+
+### 3.13 اللجنة [](https://docs.erpnext.com/docs/v13/user/manual/en/stock/delivery-note#313-commission)
+
+إذا تم البيع عن طريق أحد شركاء المبيعات لديك ، يمكنك إضافة تفاصيل العمولة الخاصة بهم هنا. يتم جلب هذا عادةً من أمر المبيعات.
+
+### 3.14 فريق المبيعات [](https://docs.erpnext.com/docs/v13/user/manual/en/stock/delivery-note#314-sales-team)
+
+**مندوبي المبيعات:** يسمح لك ERPNext بإضافة العديد من مندوبي المبيعات الذين ربما عملوا في هذه الصفقة.
+
+يتم جلب هذا عادةً من طلب المبيعات ، على سبيل المثال:
+
+
+
+### 3.15 حزم الشحن أو العناصر مع حزمة المنتج [](https://docs.erpnext.com/docs/v13/user/manual/en/stock/delivery-note#315-shipping-packets-or-items-with-product-bundle)
+
+إذا كنت تقوم بشحن العناصر التي تحتوي على [حزمة منتجات](https://docs.erpnext.com/docs/v13/user/manual/en/selling/product-bundle) ، فسيقوم ERPNext تلقائيًا بإنشاء جدول "قائمة التعبئة" بناءً على العناصر الفرعية في هذا العنصر.
+
+إذا كانت العناصر الخاصة بك مسلسلة ، فعندئذٍ بالنسبة لنوع عناصر حزمة المنتج ، سيتعين عليك تحديث الرقم التسلسلي في جدول "قائمة التعبئة".
+
+### 3.16 تغليف المواد في صناديق لشحن الحاويات [](https://docs.erpnext.com/docs/v13/user/manual/en/stock/delivery-note#316-packing-items-into-cases-for-container-shipment)
+
+إذا كنت تقوم بالتسليم عبر شحن حاوية أو بالوزن ، فيمكنك استخدام قسيمة التعبئة لتقسيم مذكرة التسليم الخاصة بك إلى وحدات أصغر. لمعرفة المزيد عن قسيمة التعبئة ، قم بزيارة [هذه الصفحة](https://docs.erpnext.com/docs/v13/user/manual/en/stock/packing-slip) . اذهب إلى:
+
+يمكنك إنشاء قسائم تعبئة متعددة لمذكرة التسليم الخاصة بك وسيضمن ERPNext أن الكميات الموجودة في قسيمة التعبئة لا تتجاوز الكميات الموجودة في مذكرة التسليم. لاحظ أنه يمكنك إنشاء قسيمة تعبئة من مذكرة التسليم فقط عندما تكون مذكرة التسليم في مرحلة المسودة.
+
+### 3.17 بعد التقديم [](https://docs.erpnext.com/docs/v13/user/manual/en/stock/delivery-note#317-after-submitting)
+
+عند تقديم مذكرة التسليم ، يتم عمل إدخال دفتر الأستاذ لكل صنف ويتم تحديث المخزون. يتم تحديث الكمية المعلقة في أمر المبيعات (إن أمكن).
+
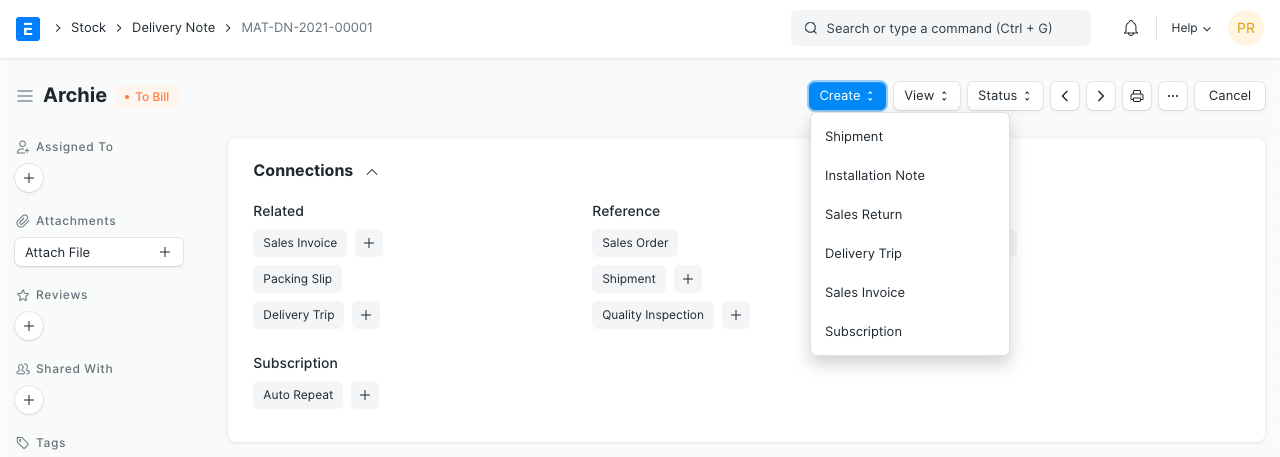
+ستعرض لوحة التحكم الخيارات التالية:
+
+1. [ملاحظة التثبيت](https://docs.erpnext.com/docs/v13/user/manual/en/stock/installation-note)
+2. [عائد المبيعات](https://docs.erpnext.com/docs/v13/user/manual/en/stock/sales-return)
+3. [رحلة توصيل](https://docs.erpnext.com/docs/v13/user/manual/en/stock/delivery-trip)
+4. [فاتورة المبيعات](https://docs.erpnext.com/docs/v13/user/manual/en/accounts/sales-invoice)
+
+
+
+> نصيحة: لمنع إنشاء إشعارات التسليم بدون أمر مبيعات ضدها:
+
+### 3.18 إرجاع طلب المبيعات [](https://docs.erpnext.com/docs/v13/user/manual/en/stock/delivery-note#318-returning-a-sales-order)
+
+بمجرد تسليم طلب المبيعات باستخدام إشعار التسليم ، يمكنك إنشاء إدخال إرجاع في حالة إرجاع [العميل](https://docs.erpnext.com/docs/v13/user/manual/en/CRM/customer) للسلعة. لمعرفة المزيد ، قم بزيارة صفحة [إرجاع المبيعات](https://docs.erpnext.com/docs/v13/user/manual/en/stock/sales-return) .
+
+### 3.19 تخطي مذكرة التسليم [](https://docs.erpnext.com/docs/v13/user/manual/en/stock/delivery-note#319-skipping-delivery-note)
+
+إذا كنت لا ترغب في إنشاء مذكرة تسليم بعد أمر مبيعات وترغب مباشرة في إنشاء فاتورة مبيعات ، فقم بتمكين الميزة الخاصة بها في [إعدادات البيع](https://docs.erpnext.com/docs/v13/user/manual/en/selling/selling-settings#32-delivery-note-required) .
+
+### 4\. مواضيع ذات صلة [](https://docs.erpnext.com/docs/v13/user/manual/en/stock/delivery-note#4-related-topics)
+
+1. [مستودع](https://docs.erpnext.com/docs/v13/user/manual/en/stock/warehouse)
+2. [خطأ في المخزون في مذكرة التسليم](https://docs.erpnext.com/docs/v13/user/manual/en/stock/articles/delivery-note-stock-error)
+3. [نقل المواد من إيصال التسليم وإيصال الشراء](https://docs.erpnext.com/docs/v13/user/manual/en/stock/articles/material-transfer-from-delivery-note)
+4. [ملاحظة التثبيت](https://docs.erpnext.com/docs/v13/user/manual/en/stock/installation-note)
+5. [رحلة توصيل](https://docs.erpnext.com/docs/v13/user/manual/en/stock/delivery-trip)
+6.